
 Im Rahmen eines Projektes habe ich jetzt das Google Maps Plugin for WordPress von Avi Alkalay eingesetzt, was meines Erachtens wirklich hübsch gemacht ist.
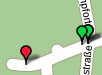
Mich hat lediglich gestört, dass man bei den angezeigten Punkten immer nur das gleiche Icon zur Verfügung hat. Da ich aber unterschiedliche POI-Klassen einbinden wollte habe ich das Script ein ganz wenig aufgebohrt, um bei den Complex Maps andere bzw unterschiedlich farbige Pins zu bekommen.
[English: This article describes an easy way to use different colored pins on the complex maps of the Google Maps Plugin for WordPress of Avi Alkalay. All you need to do is change add the bold part to the file googlemapsPlugin.js in your plugin-folger on line 378 and put the over stuff below at the end of the file. ]
Das ist auch alles schrecklich einfach und nur ein kleiner Hack: Im Plugin-Ordner bearbeitet man die Datei googlemapsPlugin.js dahingehend, dass man die fett hervorgehobenen Part einfügt:
Zeile 377: if (walker && walker.nodeName.toLowerCase() == „dd“) {
Zeile 378 this.addMarker(tempMapData.geoCoord,walker.innerHTML,walker.className);
Ans Ende der gleichen Datei fügt man jetzt folgenden Code hinzu:
function tinyIcon(opt_color){
var tiny = new GIcon();
tiny.image = tinyImage(opt_color);
tiny.shadow = „http://labs.google.com/ridefinder/images/mm_20_shadow.png“;
tiny.iconSize = new GSize(12, 20);
tiny.shadowSize = new GSize(22, 20);
tiny.iconAnchor = new GPoint(6, 20);
tiny.infoWindowAnchor = new GPoint(5, 1);
tiny.imageMap = [4,0,0,4,0,7,3,11,4,19,7,19,8,11,11,7,11,4,7,0];
tiny.transparent = „http://maps.google.com/mapfiles/transparent.png“;
return tiny;
}
var icons = [„black“,“brown“,“red“,“orange“,“yellow“,“green“,“blue“,“purple“,“gray“,“white“];
for(var color in icons){
tinyImage(icons[color], true);
}
var CAT_ICONS = [];
CAT_ICONS[„DEFAULT_ICON“] = tinyIcon(„black“);
CAT_ICONS[„my_class_name_of_items_that_shall_appear_as_red“] = tinyIcon(„red“);
CAT_ICONS[„my_class_name_of_items_that_shall_appear_as_yellow“] = tinyIcon(„yellow“);
Im untersten Part definiert man sich jetzt selbst seine Klassen. Also Autos, Häuser, Boote, Pferdepflegerinnen und weisst denen eine eigene Farbe zu ( also man ersetzt dann my_class_name_of_items_that_shall_appear_as_red durch seine eigenen Namen und weisst die entsprechende Wunschfarbe zu).
[English: In the very last part, you can define different classes and for each class a single color. Just replace my_class_name_of_items_that_shall_appear_as_red by your class-names. Add as much lines as you need (by copying the sample lines). In the code for the complex maps, just add the class-attribut for the DD-Tag f.e. <dd class=“my_class_name_of_items_that_shall_appear_as_red“ ]
Sieht man sich jetzt Avi Alkalay’s Code-Beispiel an, so muss man hier den DD-Tags nur noch eine Klasse als Attribut spendieren: <dd class=“my_class_name_of_items_that_shall_appear_as_red“ …
Fertig. Kinderleicht!
Pingback: Weitere Overlays ( Wikipedia ) beim Google Maps Plugin for WordPress nutzen : powerbook_blog